Azure Function App でコードを動かす
Azure Function Appはサーバーレスでコードを動かすことができるサービスで、AWSでいうところのLambda。
簡単なAPIとかシンプルなWebサービスを実装したりするのに使えそうな代物である。
MSのサービスなので開発はVS Code前提となる。
ここではWindows10/11環境でAzure Function Appを開発する方法をまとめる。
前提条件として Python開発環境の基本設定 を先に済ませておく。
1. 開発環境の概要
開発環境:
- Windows10/11, WSL2
- VS Code (WSL Extension, Azure Functions Extension & Python Extension)
- [WSL] Azure Functions Core Tools
- [WSL] Python 3.11 (3.12はVS CodeのAzure Functions Extesionが対応していない)
- [WSL] Azurite (Azure Storage Emulator)
開発作業の流れ:
- VS Codeでコードを書いてローカル環境でデバッグする
- Blobストレージを使う場合はクラウドに接続するかAzuriteでエミュレートする
- ローカル環境で正常に動作することが確認できたら、VS CodeからAzureアカウントにログインしてコードをデプロイする
参照:
2. Azurite セットアップ
2.1. [WSL] 必要なパッケージをインストール
sudo apt-get install npm
sudo npm install -g azurite
sudo npm install -g azure-functions-core-tools@4
2.2. [WSL] Azuriteを動かす
mkdir azurite
azurite --silent --location /path/to/folder --debug /path/to/folder/debug.log
2.3. 接続テスト
https://azure.microsoft.com/en-us/products/storage/storage-explorer/
3. VS Codeセットアップ
3.1. Extensionをインストール
CTRL + SHIFT + Pでコマンドパレットを開いてConnect to WSLを実行CTRL + SHIFT + XでExtensionを開いてAzure Functionsをインストール
(Azure ResourcesとAzure Accountも一緒にインストールされる)
3.2. Function Appのプロジェクトを作成
Terminal > New TerminalでWSL bashを開いてプロジェクトフォルダを作成
mkdir funcapp01
(1) SHIFT + ALT + A でAzure Functions Extensionを開く
(2) WORKSPACE(Local) > Create New Project
Select folder: funcapp01
Select language: Python
Select Python programming model: Model V2
Select Python interpreter: Skip virtual environment
Select template: HTTP Trigger
Name of function: http_trigger (default)
Authorization level: FUNCTION
(3) Local Project(funcapp01) > Functions > Start debugging to update this list でデバッグ実行
(4) ストレージへの接続が要求されるので Use Local Emulator (Azurite)を選択する
(5) Terminalに以下のようなログが出力される(Azure Functions Core ToolがWSLにインストールされ、python仮想環境も作成されている)
 *  Executing task: .venv/bin/python -m pip install -r requirements.txt

Collecting azure-functions
  Downloading azure_functions-1.18.0-py3-none-any.whl (173 kB)
     ━━━━━━━━━━━━━━━━━━━━━━━━━━━━━━━━━━━━━━━━ 173.2/173.2 kB 2.0 MB/s eta 0:00:00
Installing collected packages: azure-functions
Successfully installed azure-functions-1.18.0
 *  Terminal will be reused by tasks, press any key to close it.

 *  Executing task: . .venv/bin/activate && func host start

Found Python version 3.11.2 (python3).

Azure Functions Core Tools
Core Tools Version:       4.0.5455 Commit hash: N/A  (64-bit)
Function Runtime Version: 4.27.5.21554

[2024-01-30T14:04:53.514Z] Customer packages not in sys path. This should never happen!
[2024-01-30T14:04:54.449Z] 0.16s - Debugger warning: It seems that frozen modules are being used, which may
[2024-01-30T14:04:54.449Z] 0.00s - make the debugger miss breakpoints. Please pass -Xfrozen_modules=off
[2024-01-30T14:04:54.449Z] 0.00s - to python to disable frozen modules.
[2024-01-30T14:04:54.449Z] 0.00s - Note: Debugging will proceed. Set PYDEVD_DISABLE_FILE_VALIDATION=1 to disable this validation.
[2024-01-30T14:04:54.562Z] Worker process started and initialized.

Functions:

        http_trigger:  http://localhost:7071/api/http_trigger

For detailed output, run func with --verbose flag.
[2024-01-30T14:04:59.601Z] Host lock lease acquired by instance ID '000000000000000000000000BE651026'.
(6) Function Appの動作確認
http://localhost:7071/api/http_trigger?name=test にアクセスして以下のように表示されたら正常に動いている。
Hello, test. This HTTP triggered function executed successfully.
(7) Python仮想環境を作成
CTRL + SHIFT + Pでコマンドパレットを開いてSelect Python Interpreterを実行
Create Virtual Environment...を選択
Select environment type:Venvを選択
Select Python installation to create venv:/bin/python3などを選択
Select dependecies:requirements.txt- 仮想環境(venv)が作成されて、これ以降このワークスペースでTerminalを開くと自動的にvenvが有効になる
4. 開発プロジェクトの環境について
4.1. プロジェクトごとにフォルダ(環境)が作成される
Azure Functions Extensionでフォルダを指定してNew Projectを作成すると、
- ウィザードでPython Interpreterを指定してPython仮想環境(.venvサブフォルダ)が作成される
- ウィザードで入力した情報でプロジェクト環境設定(.vscodeサブフォルダ)が作成される
- Function Appファイル (function_app.py, host.json, local.settings.json, requirements.txt) が作成される
4.2. .vscodeサブフォルダの主なファイル
- settings.json -> Languate, LanguageModel, venvフォルダなど
- tasks.json -> デバッグ実行時に自動的に実行されるタスク
.vscode/settings.json:
{
  "azureFunctions.deploySubpath": ".",
  "azureFunctions.scmDoBuildDuringDeployment": true,
  "azureFunctions.pythonVenv": ".venv",
  "azureFunctions.projectLanguage": "Python",
  "azureFunctions.projectRuntime": "~4",
  "debug.internalConsoleOptions": "neverOpen",
  "azureFunctions.projectLanguageModel": 2
}
.vscode/tasks.json:
{
  "version": "2.0.0",
  "tasks": [
    {
      "type": "func",
      "label": "func: host start",
      "command": "host start",
      "problemMatcher": "$func-python-watch",
      "isBackground": true,
      "dependsOn": "pip install (functions)"
    },
    {
      "label": "pip install (functions)",
      "type": "shell",
      "osx": {
        "command": "${config:azureFunctions.pythonVenv}/bin/python -m pip install -r requirements.txt"
      },
      "windows": {
        "command": "${config:azureFunctions.pythonVenv}/Scripts/python -m pip install -r requirements.txt"
      },
      "linux": {
        "command": "${config:azureFunctions.pythonVenv}/bin/python -m pip install -r requirements.txt"
      },
      "problemMatcher": []
    }
  ]
}
4.3. Blobストレージの使い方(ローカル)
ローカル(Azurite)でエミュレートする場合とAzureに接続する場合でStorage Connectionパラメータが異なるので、それを環境変数で吸収している。
以下ローカル(Arurite)の場合の例。
local.setting.json:
ローカル環境で環境変数を設定する為に使用すファイル。
ここでは StorageConnection 変数に接続パラメータを設定している。
{
  "IsEncrypted": false,
  "Values": {
    "AzureWebJobsStorage": "UseDevelopmentStorage=true",
    "FUNCTIONS_WORKER_RUNTIME": "python",
    "AzureWebJobsFeatureFlags": "EnableWorkerIndexing",
    "StorageConnection": "AccountName=devstoreaccount1;AccountKey=Eby8vdM02xNOcqFlqUwJPLlmEtlCDXJ1OUzFT50uSRZ6IFsuFq2UVErCz4I6tq/K1SZFPTOtr/KBHBeksoGMGw==;DefaultEndpointsProtocol=http;BlobEndpoint=http://127.0.0.1:10000/devstoreaccount1;QueueEndpoint=http://127.0.0.1:10001/devstoreaccount1;TableEndpoint=http://127.0.0.1:10002/devstoreaccount1"
  }
}
function_app.py:
Function App内で Storage Connection 変数を使ってストレージ接続を定義している。
....
app = func.FunctionApp(http_auth_level=func.AuthLevel.FUNCTION)

@app.route(route="http_trigger")
@app.blob_input(arg_name="inputblob",
                path="aaa/bbb.txt",
                connection="StorageConnection")
@app.blob_output(arg_name="outputblob",
                path="ccc/ddd.txt",
                connection="StorageConnection")
def http_trigger(req: func.HttpRequest, inputblob: str, outputblob: func.Out[str]) -> func.HttpResponse:
...
4.4. Blobストレージの使い方(Azure)
Function App内の Configuration > Application Setting で環境変数を設定する。
https://learn.microsoft.com/ja-jp/azure/azure-functions/functions-bindings-storage-blob-output?tabs=python-v2%2Cisolated-process%2Cnodejs-v4&pivots=programming-language-python
「_アプリ設定の名前が “AzureWebJobs” で始まる場合は、ここで名前の残りの部分のみを指定できます。 たとえば、connection を “MyStorage” に設定した場合、Functions ランタイムは “AzureWebJobsMyStorage” という名前のアプリ設定を探します。 connection を空のままにした場合、Functions ランタイムは、アプリ設定内の AzureWebJobsStorage という名前の既定のストレージ接続文字列を使用します。」
と記載されているが、AzureWebJobsを頭につけなくても問題なかった。
なので上記ローカル環境での環境変数名に合わせると、以下のどちらかを設定すればOK。
AzureWebJobsStorageConnection
StorageConnection
4.5. Debian 12でAzure Functions Core Toolsを使うための設定
azure-functions-core-tools のDebianパッケージがまだDebian11までしか対応していないので(as of Feb 2024)、apt lineを編集する必要がある。
https://github.com/Azure/azure-functions-core-tools/issues/3431
as a workaround until the official Debian 12 package is released I was able to run the Debian 11 azure-functions-core-tools package on Debian 12.
to do so - manually replace:
https://packages.microsoft.com/debian/12/prod bookworm main
with:
https://packages.microsoft.com/debian/11/prod bullseye main
in:
/etc/apt/sources.list.d/dotnetdev.list
5. その他
5.1. プロジェクトを作り直したいとき
VS Codeを終了>フォルダを削除>VS Codeを起動
5.2. テストツール
APIDOG
https://apidog.com/jp/blog/http-request-body/
5.3. セキュリティ
Azure App Service のアクセス制限を設定する
https://learn.microsoft.com/ja-jp/azure/app-service/app-service-ip-restrictions?tabs=azurecli
5.4. difflib
difflibで文字列の差分比較をする【Python】
https://hmjp.net/archive2019/blog/basic-python-difflib/
5.5. Email
Function Appからメールを送信したい場合。
SendGridという外部サービスがよく使われているようだが、Azure Communication Serviceというのも使えるらしい。
SendGridの無償利用枠は1日あたり100通に制限されている。
5.5.1. SendGrid
5.5.1.1. Azure Functions における SendGrid のバインディング
5.5.1.2. モジュールの読み込み
実行するときにsendgridモジュールを読み込むようにする。
requirements.txt:
# DO NOT include azure-functions-worker in this file
# The Python Worker is managed by Azure Functions platform
# Manually managing azure-functions-worker may cause unexpected issues

azure-functions
azure-storage-blob
sendgrid
5.5.2. Azure Communcation Service
Quickstart: How to send an email using Azure Communication Service
https://learn.microsoft.com/en-us/azure/communication-services/quickstarts/email/send-email?tabs=windows%2Cconnection-string&pivots=platform-azportal
Python 用 Azure Communication Email クライアント ライブラリ - バージョン 1.0.0
https://learn.microsoft.com/ja-jp/python/api/overview/azure/communication-email-readme?view=azure-python
5.6. プロジェクト作成時に生成されるサンプルコード
まずはここから。
import azure.functions as func
import logging

app = func.FunctionApp(http_auth_level=func.AuthLevel.FUNCTION)

@app.function_name(name=“http_trigger")
@app.route(route="http_trigger")
def http_trigger(req: func.HttpRequest) -> func.HttpResponse:
    logging.info('Python HTTP trigger function processed a request.’)

    name = req.params.get('name')
    if not name:
        try:
            req_body = req.get_json()
        except ValueError:
            pass
        else:
            name = req_body.get('name')

    if name:
        return func.HttpResponse(f"Hello, {name}. This HTTP triggered function executed successfully.")
    else:
        return func.HttpResponse(
             "This HTTP triggered function executed successfully. Pass a name in the query string or in the request body for a personalized response.",
             status_code=200
        )
5.7. トラブルシュート
ローカルで動いているものをAzureにデプロイしてうまく動かない場合のトラブルシュート方法。
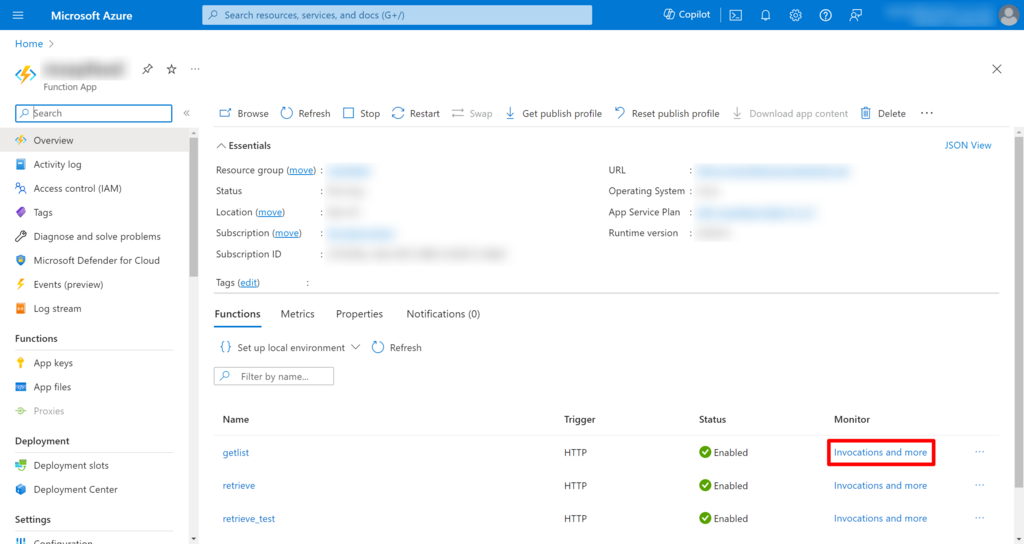
5.7.1. Azure PortalでFunctionを実行してログを確認する
Function AppのOverviewから、対象のFunctionのMonitorリンクをクリックする。(下図の赤枠部分)
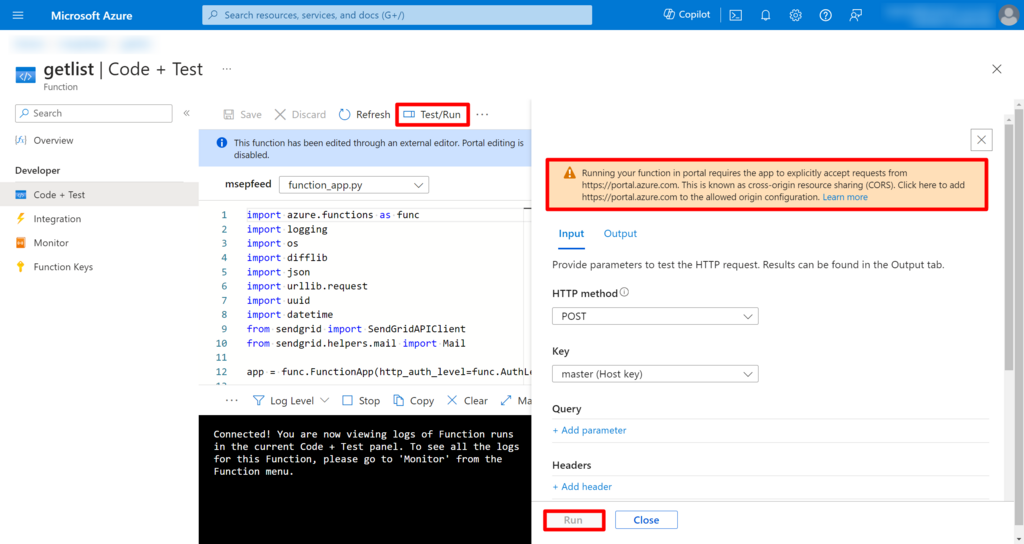
Code+TestからTest/Runを選択してFunctionを実行して動作を確認したいが、CORSのエラーが出て実行できない。
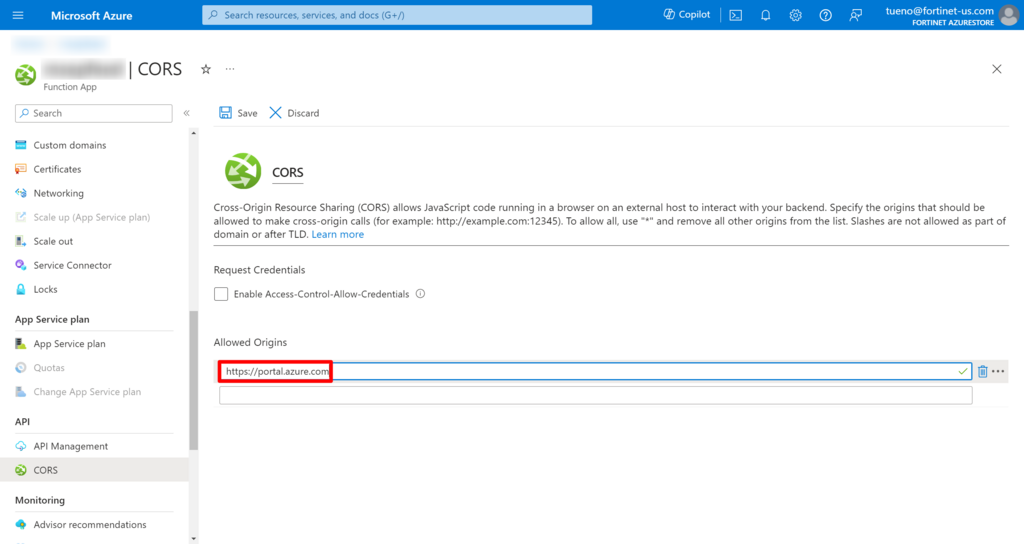
なのでCORSでportal.azure.comを設定する。
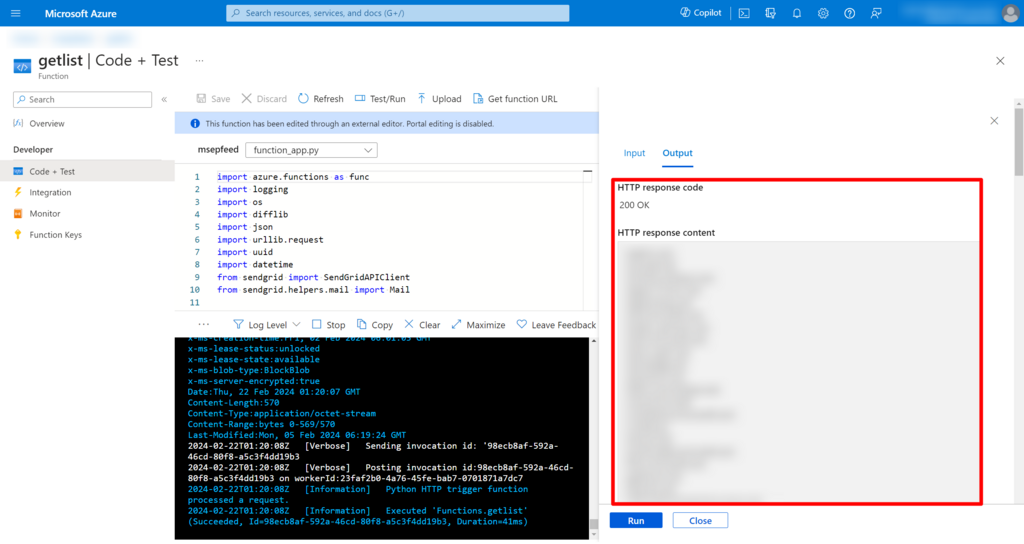
そうするとAzure PortalからHTTPトリガーでコードを実行できるようになる。

HTTPメソッド、パラメータなど設定してリクエスト実行。
左下のウィンドウにログが表示される。
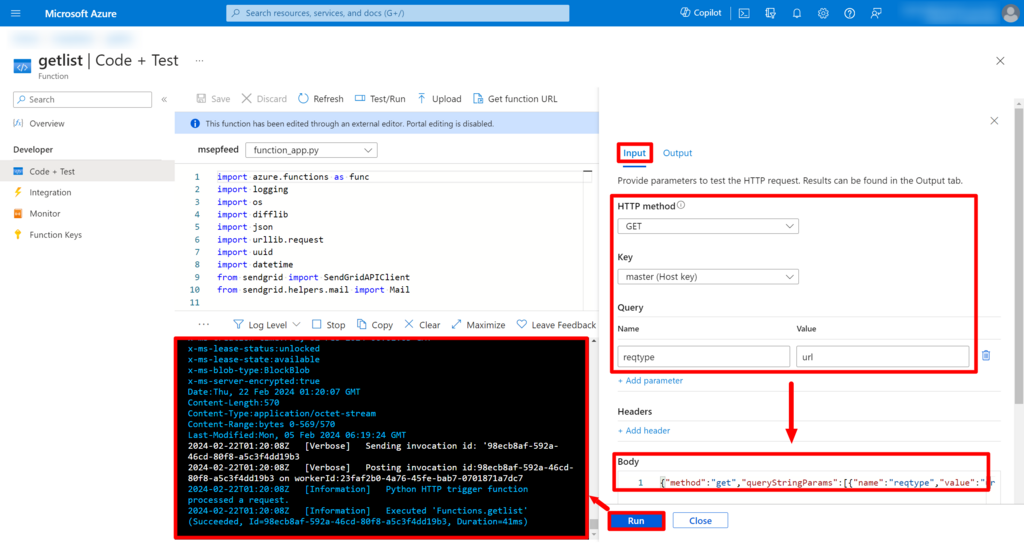
実行時の出力は右下に表示される。
